|
Tips for rocket builders:
- Reduce air friction or "drag" by making all surfaces as smooth as possible. A blunt, rounded nose causes
less drag than a sharp nose. A good design has all leading edges rounded and trailing edges tapered to reduce the drag.
- Rubber bands should be lubricated before the race. They are the "motor" and must be strong and flexible.
- Use a sharp knife for cutting the grooves for the hanger fitting and fins. A dull knife will crush and splinter
the balsa wood.
- When you start to carve, remember that the end with the small hose is the rocket nose.
- A potato peeler is good for carving the shape.
- To help increase the rocket's spped reduce the wall thikcness to a minimum of 1/8 inch. Do not weaken the
area around the hanger (carrier) or carve away the nose button circle.
- Do not apply too much apint to the outside unless you sand between each coat.
- Be careful not to get glue on the plastic carrier, especially in the holes through which the monofilament
line runs. Glue can interfere with smooth operation.
- Make the propeller shaft as short as possible by bending it close to the prop. Cut off the excess wire with
wire cutters.
- Test the rocket's balance by hanging it from a string through the hole of the hanger fitting. If the rocket
is nose-heavy, carve or sand a little wood off of the end. It it's tail-heavy, remove wood from the tail area.
Dens may wish to secure a 100-foot length of 50-pound monofilament fishing line for test runs in the backyard
before the derby. Tie the line to a tree or post and string the rocket carrier on it. Tie the other end to a tree about 100
feet away. Make the line as tight as possible.
- Lubricate the rubber bands before the derby. This prolongs the bands' life and power and will help reduce
the possibility of breaking during the competition. They can be soaked overnight in castor oil. Or mix two parts green soap,
one part glycerin, and one part water and rub the mixture on the rubber band about an hour before racing.
- Have extra boxes of rubber bands on hand. Remember, it takes three rubber bands to fly each ship properly.
- Experienced rocket racers "warm up" their space ships by gradually winding the rubber band motor to its full
capacity-first 50 turns, then 100, then 200, etc. Release the propeller between each winding.
- A small hand drill is excellent for winding rubber bands. It also helps speed up the event. Check the ratio
of the drill by making one revolution of the crank handle and cout the number of times the chuck turns. Most drills average
a one-to-four ratio, thus it would take 40 turns of the crank to give 160 winds on the rubber-band motor. When using the hand
drill winder, it's best for one person to hold the rocket and propeller while another stretches the bands about 12 to 15 inches
beyond the rocket tail and turns the rubber bands, he gradually shortens the distance between him and the rocket.
- For a more evenly matched race, wind all rocket motors the same number of turns. For 100-foot launch lines,
150 to 170 winds should be sufficient.
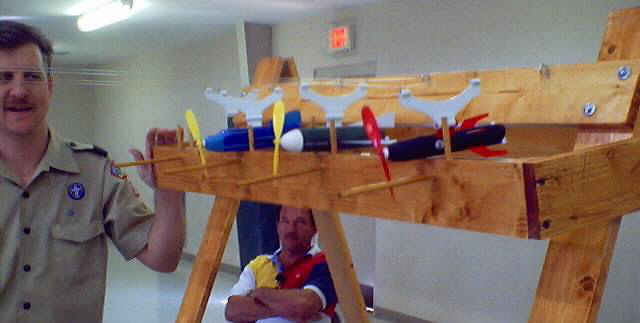
Space Derby Rocket Assembly Tips
- Glue the two halves of the rocket body together, shape with a potato peeler, then sand. Carefully align
and glue the two halves of the rocket body with Elmer's glue, or something similar. After the glue dries for 15 minutes, shape
the body with a potato-peeler until it looks roughly like a rocket. Then sand it into its final shape with medium grit sandpaper.
Wrap sandpaper around the body, holding it with one hand while you twist the fuselage with your other hand. Design tips: Fast
rockets are smooth, aerodynamically shaped, and lightweight. Make the shell of the rocket thin, but thick enough to hold the
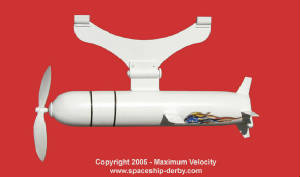
hanger that will be attached in step 4 and thick enough to support the pressure of a tightly wound rubber band.
- Cut notches for the plastic dowel. The rubber bands will slip without these notches. Do NOT glue the dowel
onto the body! The dowel will be held in the notches by the rubber bands - and must be removable so that broken rubber bands
can be replaced.
- Hold the body upright on a nail when you paint. Tap a long nail a few millimeters into a block of wood. Set the
block on a newspaper-covered floor or table with the nail pointing straight up. Slide the rocket onto the nail, inserting
the nail into the rocket’s hollow center. Paint with a couple coats of primer, sanding lightly with fine sandpaper after
each coat. Next spray on a topcoat. Don't use too much paint, you want a light rocket.

- (TAKE SPECIAL CARE WITH THIS STEP!) Attach the hanger, making sure that the rounded end points forward and that the
hanger doesn't protrude into the rocket’s hollow center chamber. Glue it on with generous amounts of glue. Cut a
grove for the hanger in the top-center of the rocket body. This 1" grove should be centered, 3" from the front and 3" from
the rear of the body. Press the hanger into this groove, rounded end forward. The hanger must not protrude into the hollow
chamber in the center of the body or it will interfere with the rubber band. The hanger must be firmly glued in place or it
may detach during launch with disastrous consequence. Use a generous amount of glue to affix the hanger to the rocket body
and allow the glue to dry overnight; a couple hours dry time may not be enough for Elmer's glue. Don’t use
it as a guide.
Don't forget.
- The hanger’s rounded end must point forward.
- The hanger must not protrude into the rubber-band chamber.
- The hanger must be very firmly glued on.
- Cut and attach the fins. Shape the fins with scissors, then cut slits in the rocket and press the fins into the
slits. Glue in place. Design tip: some claim that the fins should be angled upward very slightly. In theory this lifts
the rocket slightly off the line during flight, reducing friction.
- Trim and balance the propeller. Sand loose pieces of plastic from the propeller. If the propeller is unbalanced,
one side will swing to the floor when it is placed in a horizontal position. Sand the edges of the propeller to balance it.
- Don't tighten the cable tie. The rubber bands have already been attached to the dowel and a loop made from a cable
tie has been added. Well use this loop to wind rockets at the races. Don't tighten it. (Don't panic. This pre-assembly
and the cable-tie are NOT part of the standard kit. Some packs/troops add this before kits are handed out.)
- Pull rubber bands through with a wire hook. You can make a hook from coat hanger wire.
- Fine tune. Test the rocket's balance. Hold it lightly by the hanger with your fingers. If the rocket is nose-heavy,
carve or sand a little wood off that end. If it's tail-heavy, remove wood from the tail area or from the fins. You may be
able to unobtrusively take wood from the rocket's hollow center chamber. Some advocate lubricating the propeller with a touch
of graphite at the point where it touches the bushing. Other lubricants may melt the plastic.
|
|